Portable Scanner – HT330 Inventory Adjustments
HT330
System Defaults – Advanced Tab
Select Unitech HT330 under Portable Bar Code Scanner.
ADJUSTMENT SCANNING PROCESS
Using the Portable Bar Code Scanner to enter adjustment scanning counts*:
*Note: Your physical inventory and transaction (issue/receive/restock) data are two separate files. You can scan and download each file separately into COGZ.
The scanner is turned on using the red power button.
Do not press any buttons when on the main dashboard screen.
Swipe up for main COGZ menu

Do not press any buttons when on main dashboard screen!
Swipe up on the screen to get started.

Press the Splash A button to start the scanning application
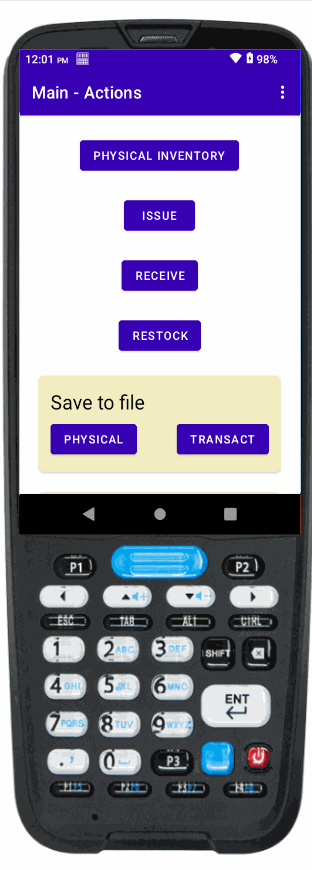
You will have a choice of inventory adjustments: Physical Inventory, Issue, Receive, or Restock.
Press the appropriate button on the screen to make the desired inventory adjustments.

The above example screens show Inventory Issue. The Receive and Restock screens are similar. Follow the steps below to scan:
1. Press the large blue button on the keypad to scan the part number.

2. If you would like to enter the item by hand, press P1 to pull up the keyboard.

3. Scan the Location.

4. Enter the count of parts on hand using the keypad and press ENT. (Scanning the third barcode on the inventory tag scans a quantity of 1.)
10. To view your current entries go to List Scans as shown on the screen below. To delete a scan, select the item and follow the prompt.

5. You may also enter WO or Equipment Number for each entry. (Not required.)

6. You may also enter your Employee ID for each entry. (Not required.)
7. Repeat from 1 above until finished.
8. When finished and it is asking you to scan another item, press the back arrow at the top of the Add Item- Issue screen to exit.

When you are ready to transfer the data to COGZ, press the Transact button under Save to File.
Press Yes to save transaction scans to file.

Ensure that the Download indicates a location of Downloads > COGZ.
Note: There should be no previously existing TransScans.txt file showing. If there is an existing TransScans.txt the previous file was not processed properly, contact COGZ support for assistance.
You will receive confirmation that the file has been created if the download is successful.

Potential Error Message and resolution instructions.
Portable Bar Code Menu
To download the adjustment data into COGZ: Start COGZ and select the Inventory menu, Adjust Inventory menu, and then Portable Bar Code menu.

Connect the scanner to your workstation using the USB cable. Using File Manager, This PC, Verify the HT330 is visible and you can navigate to its files. If not, you will need to run StageGo and scan the USB Connection bar code.
Step 1 – Press the Download Scanner Data button. If you see Copying from Mobile Device Failed, click OK and follow instructions above to connect the USB port.
Step 2 – Press the Import Data for Review button.
This process imports the data into a COGZ list for final review before actually changing your inventory.
Step 3 – Press the Review and Process Imported Data button.
After completing Step 3, make sure you clear the file in the laser scanner so your next adjustment scanning does not contain outdated information. From the Main- Actions swipe up on the screen. Press the Clear button to erase the Inventory Adjustment Transaction file in the Portable Scanner.
Inventory Bar Code Adjustment Review List – Portable Menu
This process will change the inventory to reflect the new adjustment quantities.
This list allows you to review any inventory part scans that were incorrect or are missing information. Any inventory parts with problems will remain in the list until the issues have been resolved and processed or deleted from the list.

Reset List: Deletes scan records that have been processed.
Pre-Process: Assigns default cost, equipment, vendor, and location values where there are no entries.
Process: Checks for valid data and updates inventory and related records.